How to Create a Blogpost Website for Free in 10 steps: The Complete Beginner’s Guide
Do you want to create an internet presence, promote your ideas, or tell your story without investing any money? The good news is that it’s free to create a blogpost website for free. Starting a blog doesn’t have to be expensive, regardless of whether you want to write about your interests, passions, or even to advertise a small business.
Even if you lack technical expertise, you will discover in this instruction how to create a blogpost website for free. You will have your own blog operational before the end.
Step 1: Decide What You Want to Blog About
You must decide what your blog will be about before you ever touch a computer. We refer to this as your speciality. Consider the topics you enjoy discussing, such as technology, books, fashion, fitness, travel, cuisine, or personal growth.
If you’re unsure, consider this:
- Which subjects do I like to read about?
- What abilities or experiences can I impart?
- What will inspire me to write on a regular basis?
It’s not necessary to choose the ideal speciality at once. However, focussing will assist you draw in the correct people and provide your site with a clear path forward.

Step 2: Select a Free Platform for Blogging
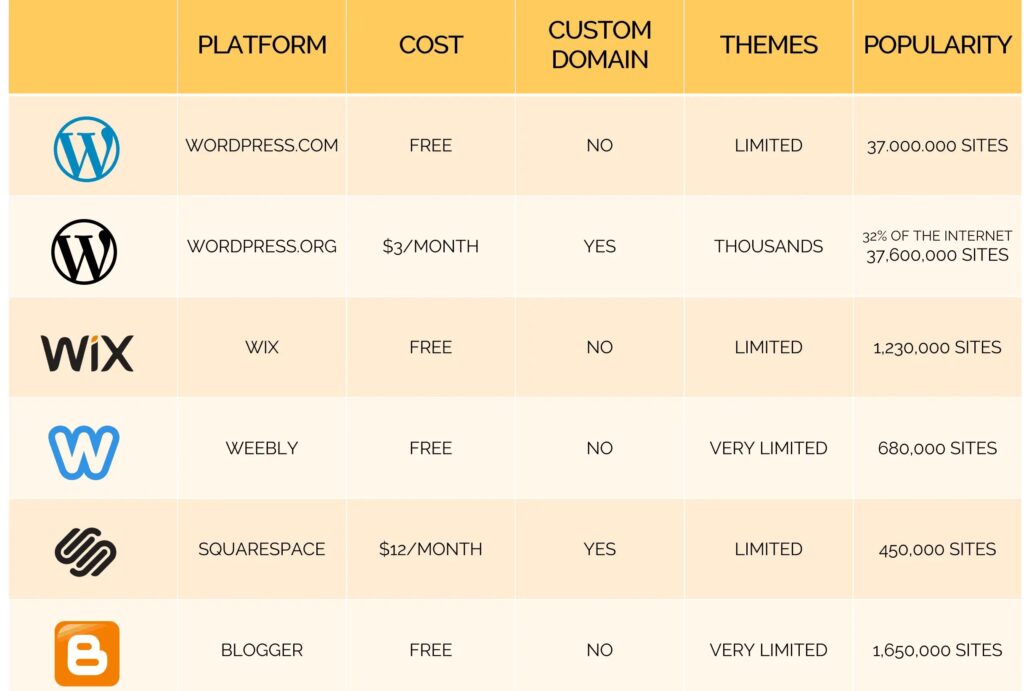
You need a platform that provides free hosting and tools if you want to create a blogpost website for free. There are several choices that are free:
- WordPress.com: One of the most widely used platforms is WordPress.com. is user-friendly for beginners and provides free themes.
- Google’s Blogger: Google’s Blogger is easy to set up and quick. All you require is a Google account.
- Wix: Wix is a drag-and-drop builder that offers eye-catching layouts and free plans.
- Weebly: Another user-friendly website builder with free blogging options is Weebly.
- Medium: Excellent for authors who want to tell stories and produce articles (less customisation).
Blogger or WordPress.com are excellent starting points for the majority of novices. They have been in business for many years and are trustworthy.
Step 3: Register and Start a Blog for Free
Let’s look at WordPress.com as an illustration:
- Visit the WordPress website.
- Press “Start your blog.”
- Register for a free account using Google or your email.’
- Decide on a name for your blog, which you may alter later.
- Choose a topic for your blog or omit it.
- Select a free domain as an example, yourblogname.wordpress.com.
- Pick the free plan. (The price page has it at the bottom.)
- You may now access your blog!
The processes are identical if you use Blogger. Simply select a blog name and begin publishing after logging in with your Google account.
Step 4: Select the Name and URL for Your Blog
Your blog name should be memorable and relevant to your subject. You may choose a name like SimpleHealthKitchen or TastyLiving if you write about healthy recipes.
Because you’re utilising a free platform, the name of the platform will appear in your blog address, such as:
- WordPress.com/yourblogname.com
- Your blog name on BlogSpot
For the time being, the free domain is ideal for getting started, but if you ever want to seem more professional, you may get a custom domain like yourblogname.com.
Step 5: Choose a Free Theme and Make Your Design Your Own
The way your blog looks is important. The majority of sites provide free themes that you may use with just a single click. Your blog’s layout, colours, fonts, and other elements are all controlled by themes.
Select a theme that is simple to use, mobile-friendly, and clean. At this point, you don’t need anything elaborate. Pay attention to readability and simplicity.
Once a theme has been chosen, you can:
- Add a profile photo or logo.
- Create a page titled “About Me”
- Choose a layout for your blog or homepage.
- Make a menu for navigation.
To learn how things operate, take some time to explore your dashboard.
Step 6: Begin Composing Your First Blog Entry
It’s time to publish your first post when your site is complete. Click Add New in the “Posts” section.
Here are some suggestions for your very first blog entry:
- Describe yourself and the topic of your blog.
- Tell a personal tale that relates to your subject.
- Compose a useful manual or how-to piece.
If at all feasible, use graphics, succinct paragraphs, and distinct headings. High-quality images that are legal to use may be found on free websites like Pexels or Unsplash.
Step 7: Add the necessary pages.
Posts alone can sustain your blog, however it’s beneficial to have a few key pages:
- About: Describe your blog’s purpose and identity to readers.
- Contact: Provide information about how to get in touch with you (email or social media).
- Privacy Policy: This is a legally significant matter if you are gathering any data or want to make money later.
The “Pages” portion of your blogging platform is where you may build them.
Check the appearance of your post by previewing it before publishing. Then distribute it!
Step 8: Make Your Blog Known Worldwide
Now that you’ve create a blogpost website and published your first article, it’s time to share it!
Start by:
- Social media sharing (Facebook, Instagram, LinkedIn, X)
- Participating in specialist online forums or Facebook groups
- Requesting that family members or friends come and provide input
The secret is to be consistent if you want to expand your audience. Aim for weekly or regular publishing so that your readers will know when to return.
Step 9: Get the Fundamentals of SEO
Search engine optimisation, or SEO, makes your blog show up in search results like Google. Even if your blog is free, you may increase its visibility by:
- Incorporating keywords into your titles and content (e.g., free blog website start-up guide)
- Writing lucid, beneficial pieces that address people’s enquiries
- Including alt text for photos
- Including internal links in your blog entries
Understanding the fundamentals of SEO will help your blog be found, but it takes time.
Step 10: Continue to Get Better and Have Fun
Blogging is an adventure. You grow better the more you write. At first, don’t stress about being flawless. Prioritise progress over perfection.
You may wish to get your own domain or upgrade to a premium plan as you expand. Enjoy the freedom of posting for free for the time being, though.
A few more pointers:
- Talk to readers in the comments section.
- Go through other blogs in your field.
- To ensure you never run out of ideas for blog posts, keep a list.
- Your voice is distinct, therefore don’t compare your blog to others.
Final Thoughts
You now understand how to create a blogpost website for free using only your time and imagination, no credit card, and no technical knowledge. It’s totally OK to start small. The first step is the most crucial.
Keep in mind that a lot of well-known bloggers began their careers on free platforms before switching to paid ones. You may start your blog for fun or it may grow into something more. In any case, it’s your place to express who you are, interact with people, and leave your mark on the internet.
What’re you waiting for, then? Select a platform, decide on a name, and create a blogpost website right now—for nothing.